Automating App Store Screenshots with Shortcuts
Tuesday 03. November 2026 17:23:00 UTC+01:00 -
Making screenshots is easy. Making the same screenshots again after a UI change is not: the right document has to be open, every window has to sit where it sat last time, and the clock has to read 9:41, for every App Store size and every language. Every App Store screenshot of Claquette, for macOS, iOS and iPadOS in every language, now comes out of one pipeline that starts with a single keystroke and uses no third-party tools: just App Intents, a few Swift scripts and the system's own actions, glued together by Shortcuts.app.
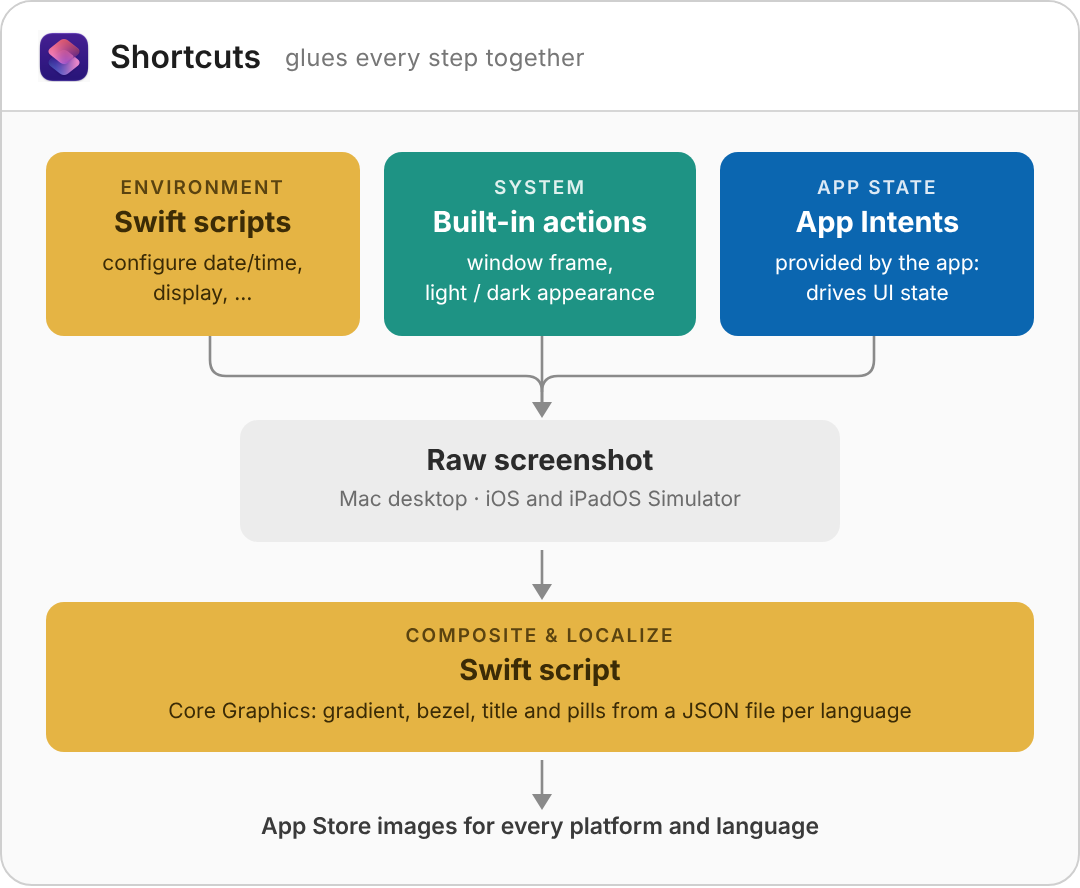
Swift scripts set up the environment, built-in Shortcuts actions configure macOS, and the app's own screenshot-only App Intents set up the app state. Then Shortcuts takes a raw screenshot of the whole screen, the macOS desktop or the full Simulator screen, and a Swift script composites it into a device bezel with localized text around it.
Set up the environment
On the Mac, Shortcuts has one big advantage: with its "Run Shell Script" action, a small (Swift) script can fill in almost anything the ready-made actions are missing, for example to set a specific date and time without an authorization prompt, or to switch the display to the resolution the App Store needs.
The rest are built-in Shortcuts actions. "Move Window" and "Resize Window" put every window in the same place, "Set Appearance" switches between light and dark mode, and the workflow selects the built-in display, so every capture starts from the same desktop.
Set up the app state
Replaying clicks is fragile: a button moves or an animation takes longer, and the sequence ends up somewhere else. Instead, Claquette has a set of App Intents, wrapped in #if DEBUG so they never ship to users, that open a document and put the app into the state I want to show. An intent describes the state, not the steps to reach it. That's easy because Claquette's navigation is very linear: from the main view, every mode is a single UI state pushed on top, so each intent is little more than a thin wrapper around the existing UI code.
struct ShowTimelineUIIntent: AppIntent {
    @Parameter var document: OpenDocumentEntity
    @Parameter var lane: Int?
    @Parameter var item: Int?

    static var parameterSummary: some ParameterSummary {
        Summary("Show Timeline of \(\.$document)") {
            \.$lane
            \.$item
        }
    }

    func perform() async throws -> some IntentResult {
        hideTips()
        await document.activateWindow()
        try await document.waitUntilReadyForEditing()

        document.startTimelineEditing()
        if let lane, let item {
            document.selectTimelineItem(lane: lane, item: item)
        }
        return .result()
    }
}
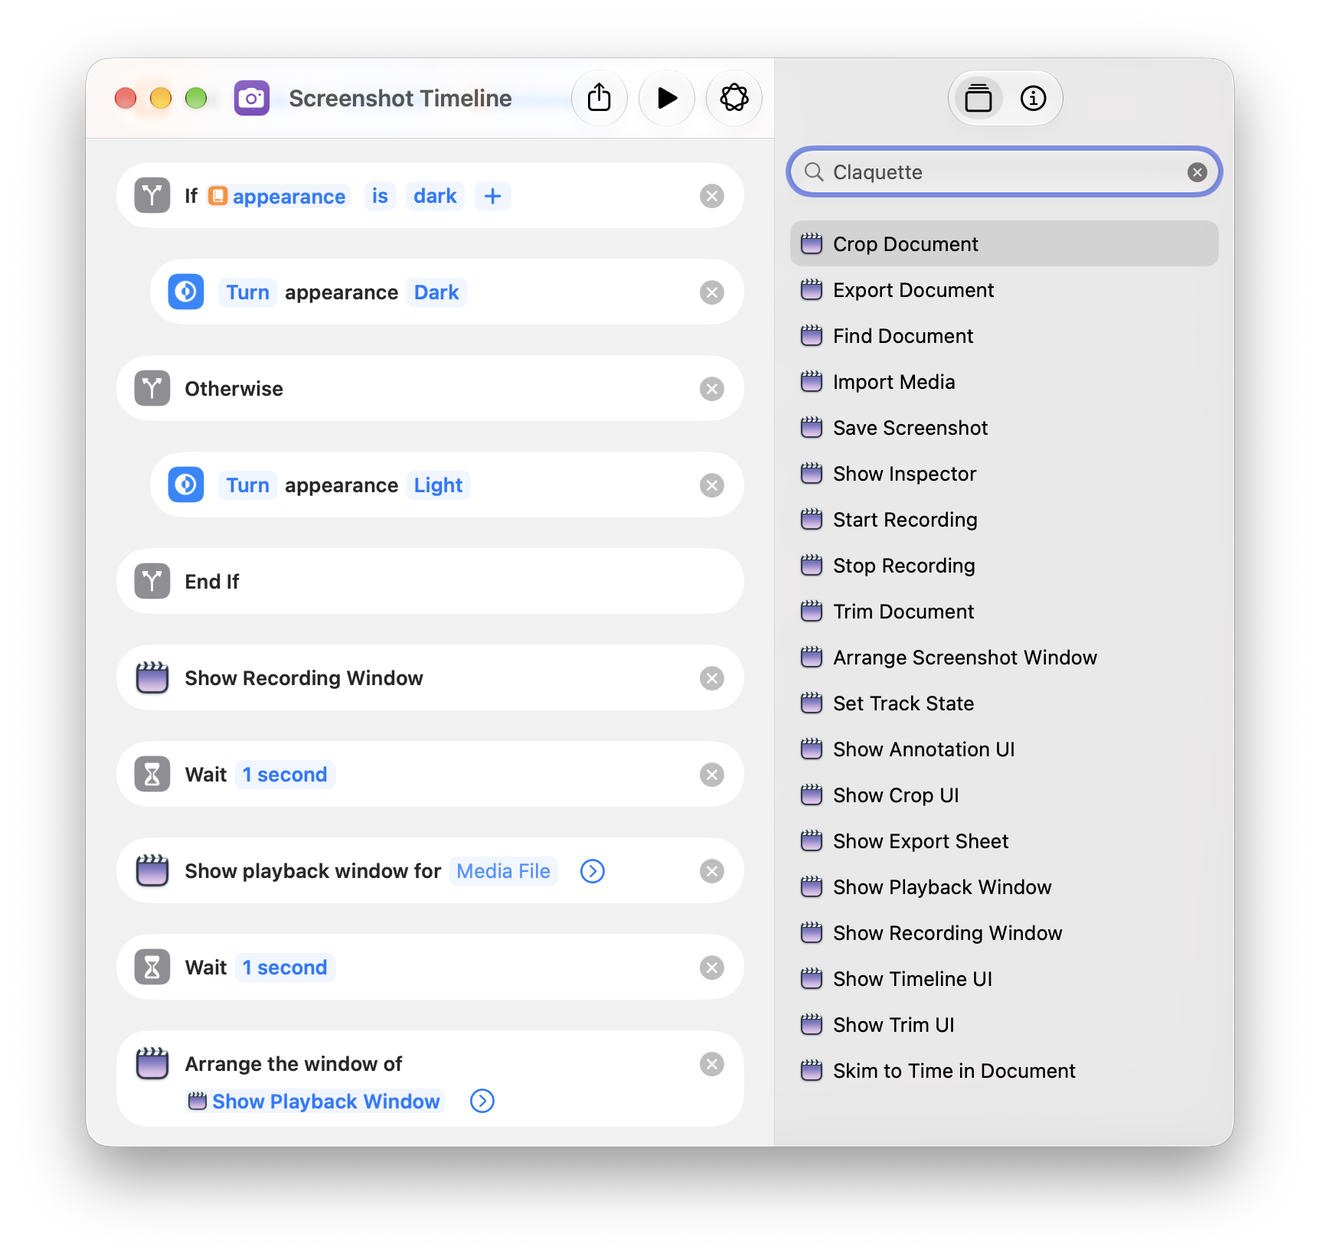
Each screenshot has its own workflow, like the "Screenshot Timeline" shortcut above. Several helper workflows wrap the system actions, such as setting the appearance or the time, and restore the original state at the end. A main workflow, "Generate Screenshots", calls into all of them. It always starts on the Mac and asks which platform to capture. For iOS and iPadOS, it dispatches the screenshot workflows into the Simulator through the Shortcuts URL scheme, xcrun simctl openurl <device> "shortcuts://run-shortcut?name=…", and sets the Simulator's status bar with xcrun simctl status_bar.
In the Simulator, the raw screenshot is saved by another debug-only intent, Save Screenshot, which writes it into the app's Documents folder. That folder is a plain folder on the Mac, so the main workflow finds it with xcrun simctl get_app_container <device> <bundle id> data and copies the file out with cp.
Composite the polished screenshot
The compositor is a Swift script that only uses basic macOS drawing APIs: Core Graphics for the gradient, the mask, the bezel and the raw screenshot, Core Text for the title and the pills. Stripped down, it looks like this:
for (platform, shot, locale) in allCombinations {
    let raw = loadImage(raws / platform / shot.file)
    let canvas = Canvas(size: platform.resolution)

    canvas.fill(shot.gradient)
    canvas.drawHeader(shot.header[locale])

    let bezel = canvas.place(platform.bezel)
    canvas.draw(raw, clippedTo: bezel.screen)
    canvas.draw(bezel)

    canvas.writePNG(output / locale / platform / shot.file)
}
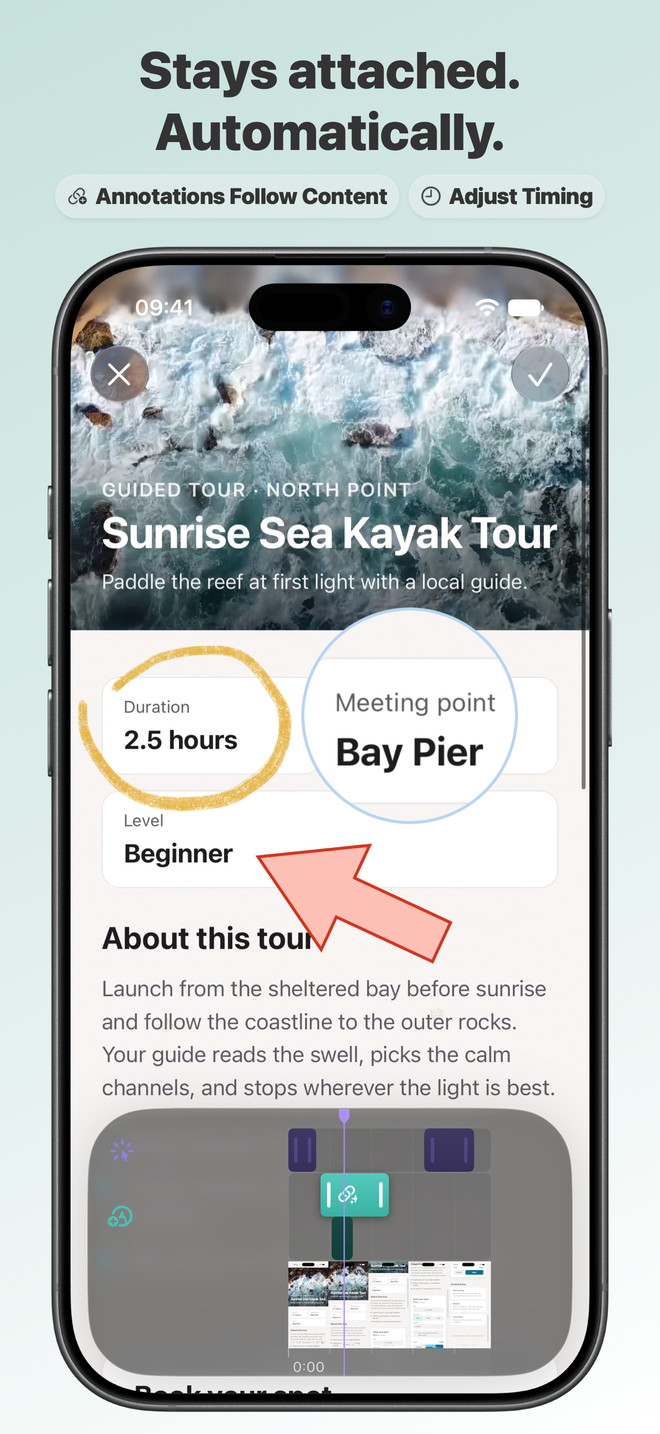
A JSON file per language defines the titles, pills, colors and resolutions. Translations reuse the base language's raw screenshots, so a new language is a new file and a compositor run, without capturing anything.
Tips
- Shortcut workflows can also be stored as files. They're just signed plists, so they can live in git and be edited by an agent like any other source file. After an edit, a workflow has to be signed again before it can be imported, as Apple describes in Run shortcuts from the command line.
- Keep capture and composition apart. Raw screenshots are expensive, because they need a running app in a specific state. Compositing is cheap and deterministic, so a new headline or gradient only means re-running the compositor, and a re-capture after a UI change keeps the same framing and layout.
- Start the workflow with a keyboard shortcut. Assign one to "Generate Screenshots" in Shortcuts.app. Started that way, Shortcuts doesn't show an icon in the Dock.
- Run every workflow once before the real run, so all system permission prompts come up and can be answered. After that, runs go through without interruption.
- Capture macOS on a fresh user account. A separate account with default settings keeps my own setup out of the screenshots.
- At the time of writing, the following devices cover every display size App Store Connect requires for Mac, iPhone and iPad, as listed in Apple's screenshot specifications. The table shows each raw screenshot size, the App Store size it's composited to and the bezel image:
| Platform | Device | Raw | App Store | Bezel |
|---|---|---|---|---|
| Mac | MacBook Pro 16" (M5) | 2624 × 1696 | 2880 × 1800 | 4260 × 2840 |
| iPhone | iPhone 17 Simulator | 1206 × 2622 | 1320 × 2868 | 1350 × 2760 |
| iPad | iPad Pro 13" (M5) Simulator | 2064 × 2752 | 2064 × 2752 | 2300 × 3000 |
| iPhone Duo, folded | iPhone Duo Simulator | 1398 × 2034 | 1398 × 2034 | 1574 × 2194 |
| iPhone Duo, unfolded | iPhone Duo Simulator, landscape | 2853 × 2007 | 2853 × 2007 | 3093 × 2247 |
The built-in display of my MacBook Pro fits the aspect ratio the App Store expects nicely, so it's the capture display. The script switches it to the scaled mode that captures at 2624 × 1696 and restores the previous mode afterwards.
Screenshots as a product output
Jesse Squires solves the same problem on the Mac with an approach based on UI tests in Automate perfect Mac screenshots, and his results look very good too. The best part of automating screenshots is that they stopped being something I do once, nervously, right before a release. They're generated from the app's current state, the same way the binary is built from the current source, and every change gets a complete, consistent set for every platform and language.